Calculating concrete volume for simple rectangular slabs is straightforward—just multiply length by width by depth. But what happens when you need to fill a U-shaped trench, a circular column with a hollow core, or a pipe with irregular cross-sections?
In this guide, we'll walk you through the process of breaking down complex shapes into manageable calculations, using real-world examples that you can apply to your own projects.
Understanding the Challenge
Complex concrete shapes present a unique challenge because they can't be calculated with a single simple formula. Instead, you need to use a technique called geometric decomposition—breaking the complex shape down into simpler geometric forms that you already know how to calculate.
The key principle is this: Complex Shape = Sum of Simple Shapes or Large Shape - Cutout Shapes. Once you understand this concept, even the most complicated concrete pour becomes manageable.
Real-World Example: U-Shaped Pipe Section
Let's work through a practical example that many contractors and DIY builders encounter. Imagine you have a U-shaped pipe section that needs to be filled with concrete. This could be a trench drain, a channel foundation, or a custom concrete form.
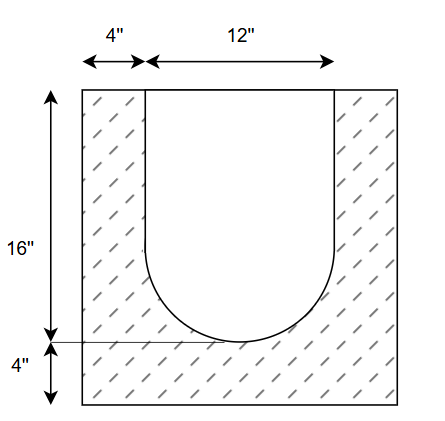
Analyzing the Shape
Before we start calculating, let's carefully analyze what we're looking at. The shape consists of:
- Outer boundary: A 20" × 20" square (made up of 4" + 12" + 4" horizontally, and 16" + 4" vertically)
- Inner cavity: A U-shaped void that we need to subtract from the total area
- Concrete fill area: The hatched regions shown in the diagram—this is what we're actually calculating
The beauty of this problem is that we can use the subtraction method: calculate the large outer rectangle, then subtract the U-shaped cavity inside. This is often easier than trying to calculate all the irregular concrete areas separately.
Step-by-Step Calculation Process
Step 1: Calculate the Outer Rectangle
First, let's find the total area of the outer boundary as if it were completely solid. This gives us our starting point.
Horizontal dimension:
Width = Left wall + Middle opening + Right wall
Width = 4" + 12" + 4" = 20"
Vertical dimension:
Height = Upper section + Bottom wall
Height = 16" + 4" = 20"
So far, so good. We have our total outer area. Now we need to figure out how much space the U-shaped cavity takes up so we can subtract it. Details
Step 2: Decompose the U-Shape
Here's where geometric decomposition comes in. Instead of trying to calculate the weird U-shape directly, let's break it down into simpler shapes we already know how to handle.
Looking at the U-shaped cavity, we can see it's actually made up of two distinct geometric forms:
- A rectangular section at the top (the vertical part of the "U")
- A semicircular section at the bottom (the curved part of the "U")
When decomposing shapes, look for natural divisions where one simple shape ends and another begins. In this case, the transition point is where the straight walls meet the curve.
Step 3: Calculate the Rectangular Portion
The top part of the U is a straightforward rectangle. We know its width is 12" (the middle opening), but what about the height?
This is where we need to think carefully. The rectangular portion extends from the top of the opening down to where the semicircle begins. Since the semicircle has a diameter of 12", its radius is 6". This means the semicircle extends 6" upward from the bottom of the opening.
Rectangle width: 12" (given)
Rectangle height calculation:
Total upper section height = 16"
Minus semicircle radius = 16" - 6" = 10"
(We use radius, not diameter, because the semicircle only extends upward by its radius)
Step 4: Calculate the Semicircular Portion
Now for the curved bottom of the U. This is a semicircle (half of a full circle) with a diameter of 12", which means the radius is 6". Details
The formula for a full circle's area is πr², so a semicircle is half of that:
For practical purposes, we can round this to 56 square inches. In concrete work, this level of precision is more than sufficient—you'll lose more concrete to waste and spillage than this rounding error represents.
Make sure you're using the radius, not the diameter, in the circle formula. This is one of the most common errors in circular calculations. The radius is always half the diameter: r = d ÷ 2.
Step 5: Calculate Total U-Shape Area
Now we add together the two components of the U-shape to get the total cavity area:
U-Shape Components:
Top rectangle = 120 square inches
Bottom semicircle = 56 square inches
Step 6: Calculate Net Concrete Area
This is the moment of truth. We subtract the U-shaped cavity from the outer rectangle to find out how much concrete we actually need:
So the cross-sectional area that will be filled with concrete is 224 square inches. But we're not done yet—this is just the cross-section. We need to figure out the total volume based on how long this pipe section is.
Step 7: Convert to Volume
To get the volume, we multiply the cross-sectional area by the length of the pipe. Let's say our pipe section is 60 inches long (that's 5 feet):
Now, cubic inches isn't the most useful unit for ordering concrete. Let's convert this to more practical units:
Converting to cubic feet:
There are 1,728 cubic inches in one cubic foot (12 × 12 × 12)
13,440 ÷ 1,728 = 7.78 cubic feet
Converting to cubic yards:
There are 27 cubic feet in one cubic yard (3 × 3 × 3)
7.78 ÷ 27 = 0.29 cubic yards
Most concrete suppliers sell by the cubic yard, but many bagged concrete products show coverage in cubic feet. Having both measurements handy helps you compare options and get the best deal.
Step 8: Account for Waste
In real-world construction, you always need more concrete than the pure mathematical calculation suggests. Material gets stuck in the mixer, spills during pouring, and you'll want some extra to ensure proper filling of corners and edges.
The standard practice is to add a waste factor of 5-10% depending on the complexity of the pour and your experience level. For this project, let's use 10%:
Alternative Scenario: Longer Pipe Section
In some discussions online, I've seen people working with much longer pipe sections. Let's say you had a 720-inch long section (that's 60 feet). The calculation process is exactly the same—just with a different length:
For a 720-inch (60-foot) section:
Volume = 224 sq in × 720 in = 161,280 cubic inches
Converting to cubic feet: 161,280 ÷ 1,728 = 93.3 cubic feet
Converting to cubic yards: 93.3 ÷ 27 = 3.46 cubic yards
With 10% waste factor: 3.46 × 1.10 = 3.8 cubic yards
See how the same process works regardless of the length? That's the beauty of breaking down complex problems into simple, repeatable steps.
Estimating Material Requirements
Once you know the volume, you can figure out how much concrete to order. Here are some quick references:
Bagged Concrete (for smaller projects like our 60-inch example):
- 60-pound bags: One bag covers approximately 0.45 cubic feet
- For 8.6 cubic feet: 8.6 ÷ 0.45 ≈ 19 bags
- 80-pound bags: One bag covers approximately 0.6 cubic feet
- For 8.6 cubic feet: 8.6 ÷ 0.6 ≈ 15 bags
Ready-Mix Concrete (for larger projects like our 720-inch example):
- Most ready-mix trucks have a minimum order of 1 cubic yard
- For 3.8 cubic yards, you'd order a full truck
- Typical cost: $125-$150 per cubic yard, plus delivery fees
Common Mistakes to Avoid
- Unit confusion: Mixing inches and feet is the #1 cause of massive calculation errors. Always convert everything to the same unit before calculating.
- Radius vs. diameter: Remember that radius = diameter ÷ 2. Using the wrong one in circular calculations will give you dramatically wrong results.
- Forgetting the waste factor: Running out of concrete mid-pour is a nightmare. Always order 5-10% extra.
- Not verifying your math: Use a calculator for each step and double-check your work. One decimal point error can cost you hundreds of dollars.
Using Technology to Double-Check Your Work
While it's important to understand the math behind these calculations, you don't have to do everything by hand. I used ConcreteProKit.com to verify all the calculations in this article. It's a free online calculator specifically designed for complex concrete shapes.
What makes it particularly useful for shapes like our U-pipe is that you can:
- Input multiple geometric components separately
- See a detailed breakdown of each section
- Get instant volume, weight, and bag count estimates
- Save and share your calculations with suppliers or team members
- Generate a shareable link with all your project details
For example, here's how you'd set up our U-pipe calculation in the tool:
- Create a new project for "U-shaped pipe section"
- Add the outer rectangle (20" × 20" × 60")
- Add the inner rectangle to subtract (12" × 10" × 60")
- Add the semicircle to subtract (radius 6" × 60" length)
- The tool automatically calculates the net volume and material requirements
You can see a complete breakdown with all the intermediate steps at a shareable link like: https://www.concreteprokit.com/calculate?shape=u-pipe&dims=20x20x60
Even if you're confident in your math, using a tool like ConcreteProKit provides verification and saves time. It's especially valuable when you're juggling multiple complex shapes in one project or need to quickly adjust dimensions based on field measurements.
Applying This Method to Other Complex Shapes
The decomposition approach we used for the U-pipe works for virtually any complex concrete shape. Here are some other common scenarios:
L-Shaped Foundations
Break into two rectangles. Calculate each separately, then add them together. Just be careful not to double-count the corner where they overlap.
Walls with Door and Window Openings
Calculate the full wall as if it were solid, then subtract each opening as a separate rectangle. This is much easier than trying to calculate all the concrete areas around the openings.
Circular Columns with Square Bases
Calculate the cylinder volume for the column (πr²h), then add the rectangular base volume separately. Add them together for the total.
Stairs and Steps
Each step is essentially a rectangular block. Calculate one step, multiply by the number of steps. If there's a solid base underneath (not just individual steps), calculate that as a sloped triangular prism and add it to your total.
Final Thoughts and Best Practices
Calculating concrete for complex shapes isn't as intimidating as it first appears. The key is breaking things down into manageable pieces and working methodically through each step.
Remember, accuracy in your calculations directly translates to money saved and headaches avoided. Taking an extra 15 minutes to carefully work through the math can save you from ordering too little (and having to make an emergency run for more concrete mid-pour) or too much (wasting money on excess material).
With practice, you'll start to see complex shapes differently—immediately recognizing how they can be broken down into simpler components. And when you combine solid mathematical understanding with modern calculation tools like ConcreteProKit, you'll have confidence that your concrete orders are spot-on every time.
Now get out there and tackle those complex concrete projects with confidence!
check out the detailed breakdown for each part of your drain at this link: